Wednesday, September 19, 2007

A Lot of Hot Air

Taleggio Cheese Souffle

It seemed all to coincidental that the battery on my mac died the same time I decided to take a little creative hiatus. So for a whole week I have been pretty much computer-less, thanks to Apple and their unreliable range of macbook batteries. Apparently this is a fairly common problem and frankly I am pretty pissed off. Luckily my macbook is still under warranty. And so my love-hate affair with Apple continues.

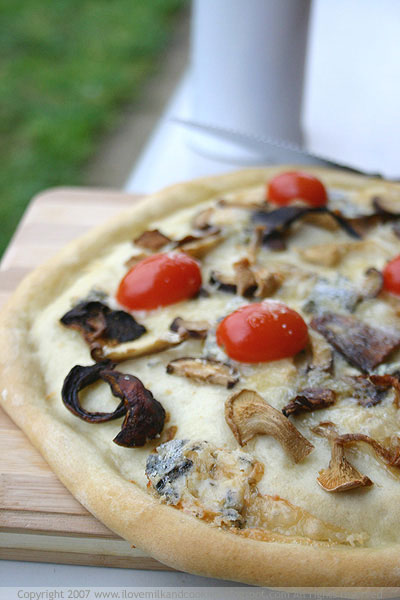
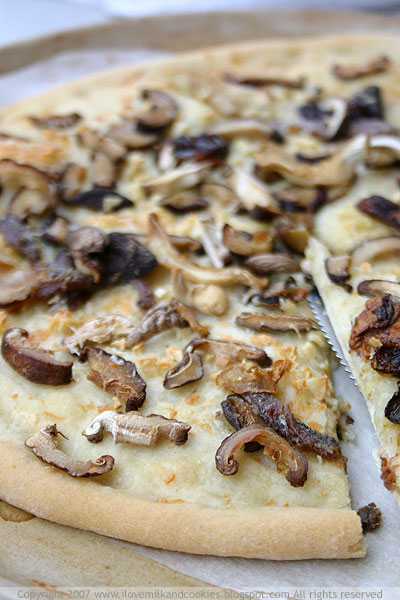
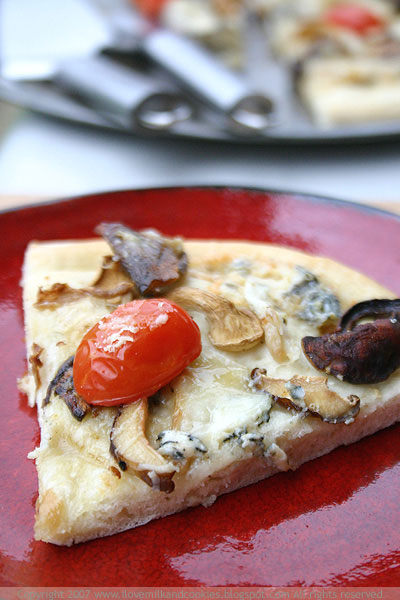
But on to better, tastier things. Like Taleggio cheese.

Taelggio Cheese

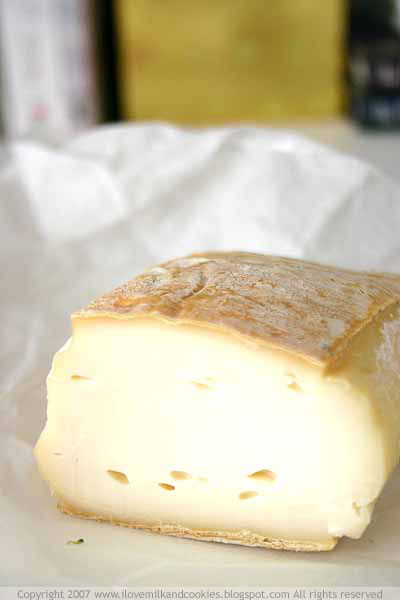
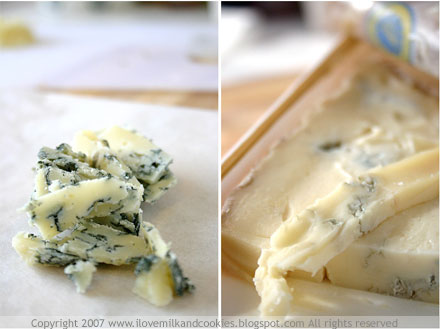
Taleggio is an Italian cheese that originates from the region of, surprise surprise, Val Taleggio. As a cheese, I think Taleggio is one of those that just have to revered. It's been around for centuries and the process of how authentic Taleggio is made has changed very little. The cheese is usually left to mature in limestone caves or cellars and are washed in a special salty brine every week in order to inhibit the growth of certain moulds.

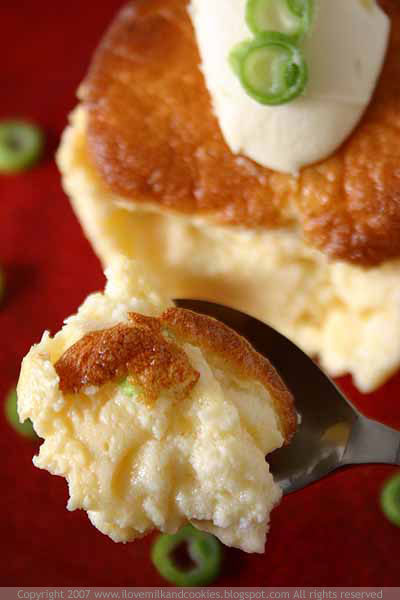
The cheese has a thin orangey-yellow rind, which you remove to expose the soft, straw-coloured runny interior which bears the pungent aroma of mushrooms and fruits. You can usually recognise the smell of taleggio a mile away, I know I can and it's taste can stay on your palate for a really long time. But in a way that will leave you wanting more. It's saltiness can be quite prominent at first but after a few seconds, hints of its sweet acidity begins to take shape.

Taleggio Cheese Souffle

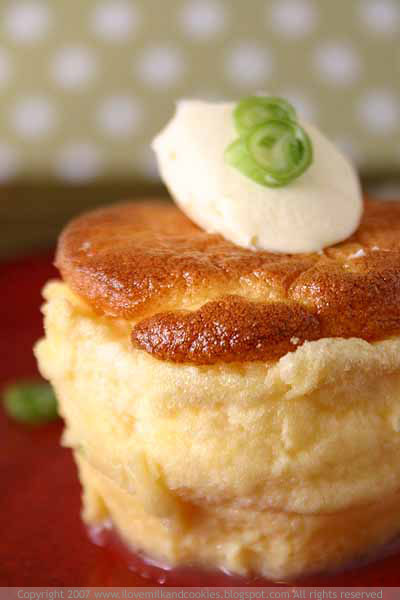
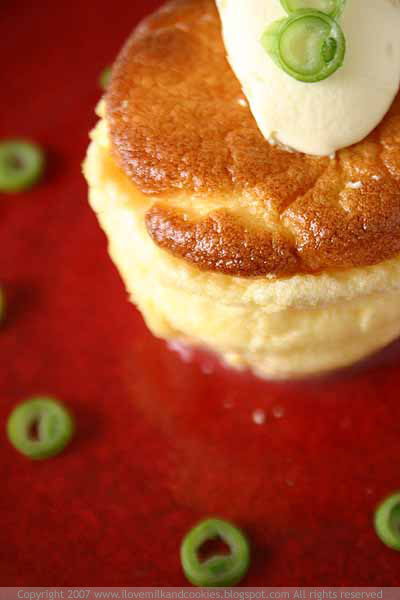
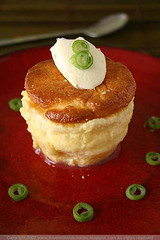
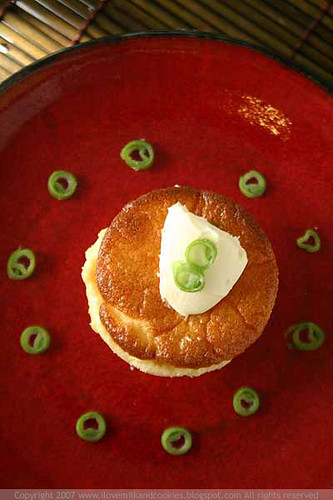
I have been known to sneak into the fridge, cheese knife in hand just slicing shards of this wonderful cheese just to satiate my appetite for it. And what better way to showcase it's beautiful taste than through a
soufflé. Really, you could substitute Taleggio for any other melting cheese, however this one is one of my favourites. Those Italians sure know how to make a cheese. And when a cheese is protected by the European Union and a whole lot of legislation and regulations, you know that there is something special about it. I am just thrilled that we can get it here in Oz.

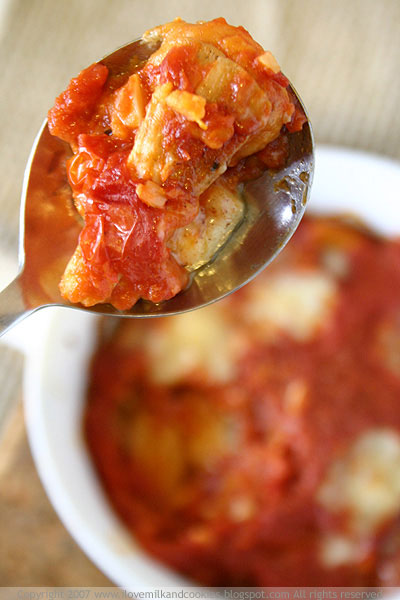
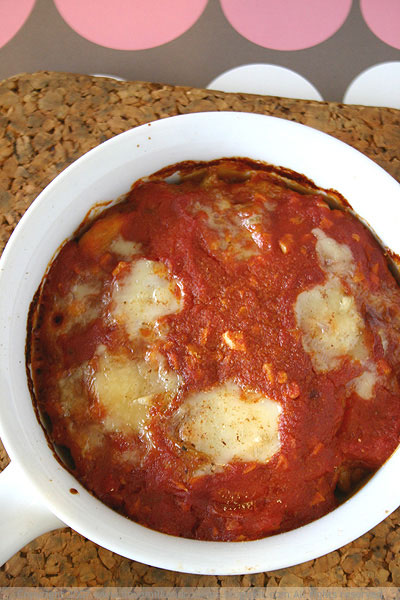
When it comes to
soufflés, well there is really nothing to them than a whole lot of of hot air, but that's the thing, all this air that makes a soufflé is the very thing that can break it. Once all that hot air is gone, then poof, there goes your soufflé with it. But the wonderful thing is that no matter if this soufflé is puffed up, glorious and risen or it has collapsed into wonderful mess, it still tastes the same.

Taleggio and souffles

And don't worry I haven't slumped into the vapid despair of the food blogging black hole. I am finding inspiration and haven't lost the fire for cooking, baking and eating, but I am just lacking the motivation to put legs on all those things that inspire me.

But I must say a massive thanks to all your well-wishes, I didn't think that I would get such a response from simply telling you how I felt. But I do appreciate all you encouragement. Spring is here and with it comes new weather and new playthings, asparagus is coming back and so are berries. Now if I can't find the motivation from those things then I don't know what will.

Taleggio Cheese Souffle

Below is the recipe for a cheese soufflé, as I mentioned before feel free to substitute the Taleggio with other cheeses- I am imagining, asiago, cheddar, gorgonzola, the choices are endless!

Taleggio Soufflé
Adapted from Australian Good Taste, June 2005
Serves 8

Taleggio Cheese Souffle

Melted butter, to grease
breadcrumbs, to dust
30g butter
2 tbs plain flour
310ml (1 1/4 cups) milk
80g (1 cup) coarsely grated taleggio
¼ cup finely chopped fresh chives
20g (¼ cup) grated grana padano
4 eggs, separated
sea salt to taste

Preheat oven to 200°C.
Brush a 1.5L (6-cup) capacity ovenproof souffle dish with melted butter to lightly grease. Lightly dust with breadcrumbs.
Melt the butter in a medium saucepan over medium heat until foaming.
Add the flour and cook, stirring, for 2 minutes or until mixture bubbles and begins to come away from the side of the pan. Remove from heat.
Gradually pour in half the milk, whisking constantly with a balloon whisk until mixture is smooth.
Gradually add the remaining milk, whisking until smooth and combined.
Place saucepan over medium heat and bring to the boil, stirring constantly with a wooden spoon, for 3-4 minutes or until sauce thickens. Remove from heat.
Add the taleggio, chives, grana padano and egg yolks, and stir until taleggio melts and the mixture is well combined.
Use an electric beater to beat the egg whites in a clean, dry bowl until firm peaks form. Add one-quarter of the egg white to the taleggio mixture and use a large metal spoon to fold until just combined.
Add the remaining egg white and fold until just combined.
Add some salt if required.
Pour the soufflé mixture into the prepared dish.
Place soufflé dishes on a baking tray and bake for 15-20 minutes or until golden brown and puffed (souffles are best when they're still slightly runny in the centre).
Remove from oven and serve immediately.

Taleggio Cheese Souffle

If you want to know more about Taleggio, why not check out The Union of Taleggio Cheese website.

Tuesday, September 11, 2007

When Bloggers Lose Their Fizz

Orange & Date Tart

What happens when you don't feel like blogging?

Well, you don't.

eggs eggs eggs

I needed to be fair on this magnificent orange and date tart, so I thought that I would wait until I was in a blogging frame of mind, lest I give it a foul review just because I wasn't feeling all too generous with my words. I don't know exactly what it was; a culinary funk, blogger's PMS, just lazy? But what I do know is that although I kept eating and baking, I just wasn't in the mood for documenting it with the sheer enthusiasm and veracity that I normally possess. Let's just call it a pause in the culinary freight train that has become my life since the inception of this blog.

I know for the past year and a half, I have been relentless in baking, cooking and chronicling my every move in the kitchen and the market. I must admit, I got a little tired of it all. I just wanted to make something, and eat it straight away and not have to wait until it has been adequately captured and recorded for the purposes of blogging. I just wanted to make something and not have to worry about its plating, its appearance, its colour scheme, what accessories to use, what background, what shots?

Orange & Date Tart with Cardamom Orange Syrup

As much as I would like you to think that I just plonk a plate in front of the camera and the pictures practically take themselves, well that is quite the contrary. And while I don't go into as much detail and aren't as meticulous as other bloggers who create magnificently flawless images that I covet, I do put some thought into the images. And now,my brain hurts. I think I have reached a creative brick wall and I need some time to climb over it, or to somehow tear it down.

So now here I am, a few days later, when I've shaken the cobwebs off my dusty brain that I bring to you this tart. I'm still feeing a little rusty, a little creatively dry, and I'm still waiting for that new eureka moment but I cannot keep shut about this tart. I made it about a week ago, but I just couldn't shake off the thought of not sharing this with you. I might be in a bit of a blah stage right now, but this tart is nowhere in the vicinity of blah-dom.

Orange & Date Tart with Cardamom Orange Syrup

I don't know what it is exactly about a tart that makes me swoon. Is it the lovely melt in your mouth pastry? The dainty filling inside? How it always manages to look so innocently wicked? I don't know what it is but this tart has it all, a rustic elegance that is luxurious yet still modest and austere. It isn't overreaching, but it's got enough good to get you to love it.

I have never paired dates and oranges before, and it simply wasn't a flavour combination that I would think up off the top of my head. But what I do know now is that it works. I now cannot fathom how citrus flavour cannot go with anything. It seems like their flavours perfectly meld with whatever it is paired with and this tart is no different. The citrus breaks up the inherent sweetness of the dates and provides a little tang to go with all that sugar.

A tart in the making

Dates can be incredibly sweet, but the great thing is that their sweetness is natural and with it comes the goodness of fibre and lots of vitamins. Who doesn't want a little helping of fibre and potassium when eating their dessert? Add little glob of thick double cream and there you have a little slice of bliss.

The cardamom syrup also adds a little bit of sugar and spice to the mix, but if you find the tart by itself sweet enough then I don't think the syrup is all too necessary. The tart might get a little dry the next day without the syrup, but I really don't think that it will last that long.

Orange & Date Tart with Cardamom Orange Syrup

Like I said, I might have run into a brick wall creatively, but I hope this doesn't steer you away from trying this tart. You never know it might just be the thing to jolt me back into the creative groove. Sugar has all sorts of effects on me.

And don't fret, I will still be writing posts. I just thought I should warn you that I'm not feeling all that inspired right now, you know, just in case I let out a half hearted rendition that will leave you all befuddled in the same way that opening of the VMA's have. Need I say any more, here is the recipe for Orange and Date Tart.

Orange & Date Tart
recipe from Delicious Magazine 2002
serves 6

Orange & Date Tart with Cardamom Orange Syrup

250g plain flour
110g pure icing sugar
110g unsalted butter, chilled
1 egg
16 fresh dates, pitted, halved
5 egg yolks
100g caster sugar
450ml cream
1 orange, zested
thick double cream, to serve

Cardamom syrup
10 green cardamom pods
1 orange, zested
6 oranges, juiced
225g caster sugar
2-3 tbs brandy

Preheat oven to 190°C.
Place flour and icing sugar in a food processor and process to combine.
Add butter and process until mixture resembles fine breadcrumbs.
Add egg and process until a smooth ball.
Wrap in plastic wrap and refrigerate for 30 minutes.

Roll out pastry on a floured surface and use to line a rectangular tart pan with removable base.
Line pastry with baking paper and fill with rice or pastry weights.
Bake for 10 minutes. Remove paper and weights and return to oven for 10 minutes until crisp and golden.
Place halved dates in pastry case.
Reduce oven temperature to 160°C.

Beat egg yolks and caster sugar in a bowl until combined.
Stir in cream, then strain.
Stir in zest and pour over dates.
Bake for 30 minutes or until just set. Set aside to cool.

Meanwhile, to make the syrup, use a mortar and pestle or rolling pin to lightly crush cardamom pods.
Remove seeds and discard pod.
Place seeds in a pan with remaining ingredients and cook over low heat, stirring, to dissolve sugar.
Simmer over low heat for 10 minutes.
Set aside to cool before serving with the tart.
Serve with a dollop of double cream.

Thursday, September 06, 2007

Gnocchi Two Ways

Pan Fried Potato Gnocchi With Mushrooms and Gorgonzola Sauce

No sooner than when I rejoiced over the advent of spring that winter comes back to bite us in the you-know-what. Winter weather has returned and so have the rains. I don’t know if this is Sydney’s way of welcoming the dignitaries arriving for the APEC conference, but it sure hope it doesn’t stick around for too long. I was just enjoying the sunshine and warm weather, and I could smell summer was just around the corner. Now it feels like summer is around the corner and down five more blocks away. What is with this erratic weather?

If you wanted to conjure up what the weather has been like, well it’s the kind that makes you want to stay in your pyjamas all day, the kind that makes you crave something warm for your belly and it’s the kind of weather that forces you indoors. Be that as it may, there is no need to fret. I have something sunny and light to wash away those cold weather blues.

Sweet Potato Gnocchi Two Ways

Gnocchi- it probably isn’t the first thing you would think of when you cite being “light” as one of its qualities, it’s more words like stodgy, doughy, indigestible that come to mind. I know because I have never met a gnocchi that I have liked, they have always been too filling, too starchy and it seems like all it does is expand in your stomach after you have eaten just a few morsels. I never order gnocchi at restaurants because I just never see the point, one portion leaves you too stuffed to taste anything else- which for me means no dessert- which I just cannot abide with.

So what say you is the solution to heavy humdrum gnocchi? Add a little ricotta and change it’s colour; that’s what I did and it worked for me.

From dreading gnocchi to actually enjoying it, it was quite a reversal of opinion after tasting these. The key is the ricotta, it allows for a lighter fluffier dough as opposed to a typical gnocchi which is usually made only of flour and potatoes. It's amazing how moreish this gnocchi actually is, I never imagined myself craving another helping.

Pan Fried Potato Gnocchi With Mushrooms and Gorgonzola Sauce

The recipe yields an enormous amount of gnocchi that I didn't know what to do with it all at first. I digressed from the initial urge to just boil them in a pot, and wanted to try something different. I have seen other ways of cooking gnocchi other than boiling, so here are the two ways that I chose to cook them- pan fired and baked. In both methods, the gnocchi develops a thin crispy outer layer while the inside remains steamy and fluffy.

Both ways contain mushrooms and Gorgonzola, leftovers from what I didn't put on the pizzas. You might be thinking that I must have wheels and wheels of Gorgonzola lying around as that it has made an appearance in some of the non-dessert items I have made lately. Well, no I don't hoard huge amounts of the stuff, I just know how to make a wedge of Gorgonzola last a really long time. The first version is the pan-friend gnocchi with sage butter, mushrooms and Gorgonzola sauce and the second one is a baked gnocchi with tomato sauce.

Pan Fried Potato Gnocchi With Mushrooms and Gorgonzola Sauce

For the first batch all you need to do is- heat up a tablespoon of butter in a medium frypan and fry up some sage leaves just enough to infuse the butter with it's aroma. Then shallow fry the gnocchi until it is brown on both sides. Remove gnocchi from frypan and transfer to a paper towel to drain. With the heat still on, add the mushrooms (I used oyster) and fry them up until they are soft, you might want to add a little bit more butter at this point as the mushrooms will soak it up quickly. When the mushrooms are almost cooked, add a few cubes of Gorgonzola and melt. Plate the gnocchi up and place the mushroom sand sauce the gnocchi.

For the baked gnocchi, you will need to prepare a tomato sauce before hand (recipe below). Then preheat an oven at 180°C. Line a baking dish with gnocchi and drizzle with olive oil. Bake for 20 minutes or until the gnocchi begins to brown and form a skin. Then add some chopped mushrooms. Pour the tomato sauce over the gnocchi, ensuring that the whole dish is covered in the sauce. Lodge a few cubes of Gorgonzola into the sauce and return to the oven for another 15 minutes. Remove from oven and serve.

Baked Sweet Potato Gnocchi with Mushrooms and Tomato Sauce

Which way did I prefer? To be honest I couldn't choose between them. The pan fried version with the sage was absolutely divine, the sage and Gorgonzola perfect compliments to each other and the beautifully crusted gnocchi was fun to bite into. While the baked version made for a perfectly smooth and creamy rendition of gnocchi. A far cry from the disasters I have tasted before and exactly what I needed on a dreary day like to day.

Basic Sweet Potato Gnocchi Recipe
Adapted from epicurious.com

Sweet Potato Gnocchi

2 medium sized sweet potatoes, washed and pierced all over with a fork
250g fresh ricotta cheese
½ cup finely grated Parmesan cheese
½ tsp freshly grated nutmeg
½ tsp sea salt
1 egg
2 cups all purpose flour

Preheat oven to 200°C. Line a baking sheet with parchment paper.
Place sweet potatoes on tray and bake for 45 minutes to an hour; until the skin is browned and the flesh is soft.
Remove sweet potatoes from oven and allow to cool to room temperature.
Cut potatoes in half and use a spoon to scrape out the flesh and mash.

In a large mixing bowl, combine the sweet potato flesh, ricotta, Parmesan, nutmeg, salt, egg and flour.
Combine the ingredients until a soft dough forms.
Refrigerate for 30 minutes.

Turn dough out onto floured surface; divide into 6 equal pieces.
Rolling between palms and floured work surface, form each piece into a long rope 2.5cm in diameter, sprinkling with flour as needed if sticky.
Cut each rope into pieces about 1cm wide.
Roll each piece over tines of fork to indent.
Transfer to baking sheet.

Tomato Sauce

1 tablespoon olive oil
2 cloves garlic, chopped finely
½ tsp dried chilli flakes
sea salt, to taste
400g can of chopped tomatoes

In a saucepan heat up olive oil over medium heat.
Fry garlic and dried chilli flakes for two minutes, add salt.
Pour in tomatoes and simmer for 30 minutes or until the sauce has thickened and become a deeper red.


Baked Sweet Potato Gnocchi with Mushrooms and Tomato Sauce

Saturday, September 01, 2007

Springing Into Action

Mushroom and Gorgonzola Pizza

It’s official, spring has begun! And today felt exactly what you imagine a perfect spring day should be. The morning started off with a little rain, but then made way for the sun to peer through the clouds and dissipate all the dreariness.

Even though the weather had already bade winter farewell a whole week ago by offering Sydneysiders a premature glimpse of what was to come with unusually temperate conditions, the weekend was the ideal time to soak it up. According to the weather bureau our temperatures have been about 10° above average the past couple of weeks, which apparently is unprecedented. I don’t know if global warming has anything to do with it, but these abnormal weather conditions do have slight advantages, even when they are a little short-sighted.

How, you might ask, did we spend such a genial spring day?

Mushroom and Anchovy Pizza

Well firstly we made a trek to the Prymont Grower’s Market, which occurs on the first Saturday of every month in Sydney. It’s a real crowd puller and pleaser, and even though I had my camera at the ready to take photos, the rain dampened my eagerness to whip out the lens and take some shots. Much of the trading did stop for a few minutes with many punters ducking for cover under one of the many umbrellas in the park grounds. But this didn’t stop us for every long.

I know this because after about 45 minutes of shopping, my mother and I had pretty much no cash left in our wallets, we knew we had spent up, big. Most of the wares were for a hamper we were making for my dad, for tomorrow- Father’s Day- manly foodie presents, like venison sausages, lamb patties and mountain muesli. We also indulged our sweet tooth with a selection of goodies from Manna From Heaven, a must-stop at these markets.

Mushroom and Gorgonzola Pizza

I also ended up going home with a 15kg bucket of honey from my friends at the Harden Honey (also known as Australian Honey Cellars) stand- a generous gift in exchange for taking some photographs for their website. Now, this proved to be a quite an aerobic exercise lugging all our stuff, including the 15kg bucket of honey back to car. What would have typically been a pleasant 5 minute stroll became an arduous hike of Tour de France proportions. But we made it back and I must say a big thank you to De and Kye, for organising the honey.

I usually stop by and gawk at the beautiful cheeses at the Formagi Ocello stall but I never like to endure the long wait to actually buy, because it’s a brutal wait, especially if you aren’t tenacious enough to assert your place in the “queue”. But after finally getting to buy some Gorgonzola last visit, I decided to buy some more Gorgonzola- this time the dolce, and also a 450g block of Taleggio- can’t wait to get stuck into that.

Gorgonzola- Piccante and Dolce
Gorgonzola Piccante (left) and Dolce (right)
The piccante is harder and has a stronger flavour while the dolce is sweeter and is soft inside.

I only bought a small sliver of Gorgonzola as I had some left over from last time and I wanted to have enough cash left to buy a bigger chunk of Taleggio, something I’ve only had once before. Who knew cheese could be expensive? That said, you probably already know what we ended up making with the gorgonzola and the leftover vegetables in our fridge- pizzas for lunch!

Nothing beats homemade pizza on a warm, sunny afternoon. After we had worked up such an appetite hauling our wares, it was only high time to enjoy ourselves a little bit of carb-filled action. The pizzas mostly came from a little bit of improvised luck and the ingredients were what we already had on hand, so the pizzas are quite rustic and unadorned. But I don’t like my pizzas hampered down with too many flavours anyway, so it was wonderful.

Mushrooms- Shitake, Oyster, Porcini

I don’t exactly have a recipe for the pizza dough as my method this time was, well, let’s just say it wasn't scientific. It was basically a mixture of “00” flour, yeast, water, salt, sugar and olive oil, and it was more fortuity that made it work than anything else. So here are some examples of pizza dough recipes that I think would be great to try out:

Basic Pizza Dough from The Silver Spoon
Heidi’s Best Pizza Dough Ever
Pizza Margherita from cuisine.com.au

We made two different pizzas, both with mushrooms, as we had a surfeit in the pantry- one was a mixed mushroom- (oyster, shitake, porcini), tomato and gorgonzola pizza (pictured first) and the other was a mixed mushroom, anchovy, garlic and parmesan (pictured below).

Mushroom and Anchovy Pizza

It’s recommended that you buy a pizza stone to bake your pizzas on in the oven. They make the under crusts of your pizzas crusty instead of soggy which makes them taste a feel a lot closer to the kind of pizza you would get from a restaurant that is typically wood-fired. And the great thing is that they only cost about $20. Well worth it for a perfect crust on your pizza.