Friday, April 27, 2007

The Penguin Parade

Penguin Waffles- Woodles

A group of penguins is usually referred to as a colony of penguins. Although, when they are breeding, their colony turns into a rookery or a peguinery. When they are floating out at sea, they are then a raft of penguins. When they are on land they are a waddle of penguins. And other times they are referred to as a parcel and sometimes a huddle. So then, what is the collective noun for a group of penguin waffles?

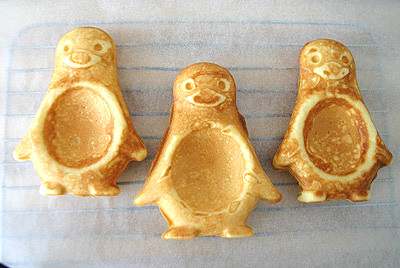
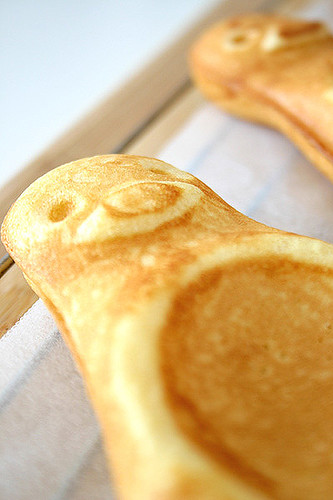
I personally am quite amused by the phrase "a waddle of penguins", but for this instance I am calling this particular breed a parade of penguins. Quite adorable is this parade, and to think that they are meant for eating seems almost a sacrilege. But now that a collective noun has been established for these new breed of penguins, that neither swim nor waddle, I can get onto explaining what exactly waffles have to do with penguins.

Penguin Waffles

It all started while rummaging through an old cupboard that held all of mum's old Mother's Day presents. Yes, she has such a thing, a stockpile of all the unusable presents we gave her as children. You know the kind of presents that mum gets from her kids that she really can't do anything with but simply nod and smile in appreciation of her children's inherent thoughtfulness- no matter how unpractical. In this secret hoard are things like potpourri, bath oils, foot spas, hair crimpers, an endless amount of trinkets and more cosmetics than you could poke a stick at.

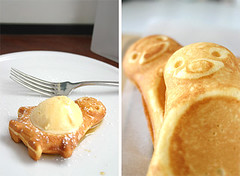
So while going through this mass of "junk" I came across this Sunbeam Waffle iron called Woodles. Woodles makes waffles in the shape of penguins and creates a depression in the belly of the penguin where ice cream can be scooped into. The contraption is sheer novelty and sheer genius! Well every childish sensibility in me was tickled by the very idea of Woodles. So I decided that since my mother could find no use for it, that I would take it for myself. Neither she or I could remember when she received this present, although all we know is that my sister gave it to her, probably in the vain hope that mum would start making these woodles for her. She never did.

Penguin Waffles with Homemade Vanilla Bean Ice Cream

But not to worry, years later, I have found a great use for it and will hopefully revive this poor creature's popularity. For me most of its appeal comes in that indentation in the penguin's stomach that makes room for ice cream. It's a great example of culinary design and engineering and who knew it could be found in a penguin's physique.

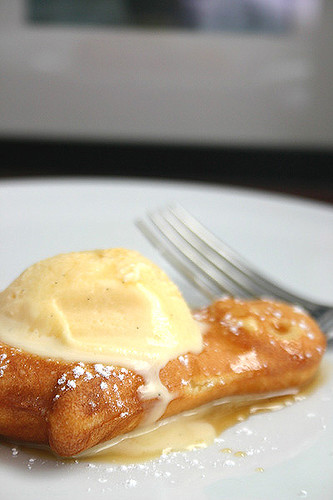
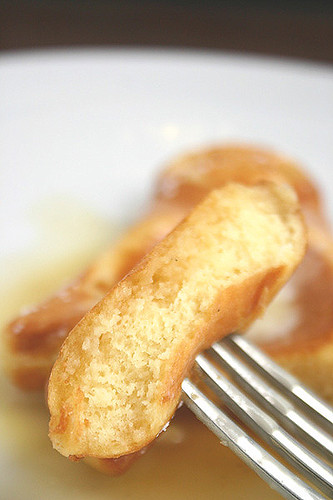
These waffles are a variation of Heidi's Sour Cream Waffles only instead of sour cream I used buttermilk. I decided to do this upon happening on some nearly overdue buttermilk in my fridge. Better that they be used to make waffles than never to be used at all and end up in the rubbish heap. The buttermilk lends to a denser and slightly tangy waffle, which I think is a great contrast to the sweetness of the ice cream and maple syrup.

Penguin cross section

Obviously, this recipe can be made regardless whether or not you own your very own peguin waffle maker, although the novelty of having your waffles in the shape of a penguin is worth shelling out the $30 for one. Mother's Day is coming up, perhaps your mother, unlike mine will appreciate the childish fancies of having one.

Buttermilk Penguin Waffles
adapted from this recipe
makes 10 penguins

Woodles

1¾ cups plain all-purpose flour
1 tbsp caster sugar
1 tbsp baking powder
a pinch of salt
1½ cup buttermilk
3 large eggs
100g unsalted butter, melted
maple syrup and vanilla bean ice cream to serve

Preheat and lightly grease waffle iron.
In a large bowl sift in flour, sugar, baking powder and salt and make a well in the centre.
Whisk in the buttermilk, eggs and melted butter until the flour is just incorporated. Make sure you do not over mix.
Spoon batter onto the centre of the waffle iron and close the iron.
Cook for 3-4 minutes until the waffles are golden brown.
Serve the waffles with a drizzling of maple syrup and vanilla ice cream.

Wednesday, April 25, 2007

Hey hey!

Blog of The Day

I'm really not one to brag, really, I'm not. But I couldn't help but share that I got the first ever mention for Australian Blog of the Day at The Local. The website is a great resource for what's going on in the Aussie blogosphere, so the mention comes with a lot of honour and also an immense amount of gratitude. So, a big thank you to all who read this blog, and especially all who comment and leave really nice notes for me to read everyday, I really am grateful that you come and stop by everytime.

Monday, April 23, 2007

Lavender Dreams

Lavender, Orange and Almond Cakes

I read somewhere that scent is the strongest trigger for memory recollection. And somehow I think this is true. A childhood playmate of mine that I no longer have any contact with; I have no idea where she lives, what she is doing, or even what her surname was. Although my strongest memory of my time with her consists of her grandmother. Her grandmother smelt of lavender, and everytime I get a whiff of lavender, it takes me back to the days when I would play in her backyard and her grandmother would lovingly watch on through her bedroom window.

She never said much and if it weren’t for that distict fragrance of lavender, those memories never would have stuck. Along with potpourri and rose scented powder, everytime I smell lavender I always think of grandmothers.

Lavender, Orange and Almond Cakes

Not only does lavender conjure up recollections of grannies, but there is something romantically provincial yet wildly exotic about it. It invokes imaginings of open meadows lined with rows and rows of purple flowers growing wild and unfettered, and also of merchant ships bound for open sea bringing cargoes of colourful blooms to other lands. It's that duality between its rustic charm and sense of adventure that just makes me love lavender.

Edible flowers always fascinate me, rose petals, saffron, orange blossoms and lavender all have that delicate ethereal quality that renders food all the more tantalising. A cake is merely a cake, but when topped with handfuls of rose petals, somewhat idealises it and makes it even more swoon-worthy. So when the opportunity came to make something out of edible blooms, I jumped at the chance without hesitation.

Lavender, Orange and Almond Cakes

I love individual cakes, if you haven't already caught on. These days, rarely do I ever make a full-sized cake as that I find they disappear a lot quicker when they are individually packaged. When presented with the choice to make one big cake, or butter and line 12 individual moulds, I will always choose the latter. Even though it's a lot more time consuming and takes an extra effort, for me, small and individual always takes the cake. (Excuse the pun, but I couldn't resist.)

Small cakes are definitely they way to go, and all the more when they are topped with dried lavender buds and a dusting of icing sugar. The cake's batter is also mixed with the dried lavender buds which lends a slighty floral scent to cakes. A proper balance of aromatic sweetness is achieved and with lavender, and it is always a good rule of thumb that a little is always better than too much. Lavender buds can become quite bitter and overpowering all too easily, so having less than you think is always enough.

The cakes have a beautifully light and moist crumb. It doesn’t fall apart on your fork but it’s soft enough to melt easily in your mouth. The cakes are not overly sweet, and it’s best to keep it that way so as not to lose all the lovely lavender flavours you laboured to bring out.

Dried Lavender

FIVE quick facts about lavender:

The smell of lavender can help with insomnia and sleep disorders.

Whiffing lavender oil during your next dental visit may blur the memory of your pain.

According to folklore, spouses who place lavender flowers between their bed sheets will never quarrel.

During Ancient Roman times, lavender flowers were sold by the pound for 100 denari. This was equivalent to a a month’s wages for a farm labourer or 50 haircuts from the local barber.

During the height of the Plague, glove makes at Grasse would scent their leather with lavender oil as it was belived to ward off fleas, known carriers of the plague.

This cake is for this month's Sugar High Friday themed Flower Power, hosted by Monisha of the delctable blog Coconut Chutney. Check out the round up on her blog in the next few days.

Lavender, Orange and Almond Cakes
from this blog

makes 12 little cakes

Lavender, Orange and Almond Cakes

FOR THE CAKE
4 tsp dried lavender
250g caster sugar
225g unsalted butter, at room temperature
juice from 2 large oranges
finely-grated zest from 2 oranges
¼ tsp almond extract/oil
4 eggs
¾ tsp salt
200g plain all-purpose flour
2 tsp baking powder
50g ground almonds

FOR THE TOPPING
50g flaked almonds
icing (confectioner’s) sugar for dusting
1 tsp dried lavender, for garnish (optional)

Preheat oven to 180˚C and grease 12 individual cake moulds and lie with parchment paper.
Put the lavender and some of the sugar in a clean coffee grinder or food processor and grind to a powder. Alternatively, if you do not have either one, you can just do this in a mortar and pestle. It will just take a little bit more elbow grease.
Combine this with the rest of the sugar.
Cream the lavender sugar and butter together until light and fluffy.
Add the orange juice, zest, almond extract and eggs.
Sift together flour, baking powder and salt and beat into the wet mixture, along with the ground almonds.
Pour the batter into prepared individual moulds, leaving 1 cm from the top.
Sprinkle the flaked almonds evenly over the top and dust with icing sugar.
Place the moulds on a baking tray and bake in oven for 35-40 minutes, or until toothpick inserted in the centre comes out clean.
Cool the cakes for 10 minutes and unmold carefully.
Sprinkle with the dried lavender and serve.

Friday, April 20, 2007

The Delight of Discovery

Chocolate Mousse with Caramel Truffle

There was a time when all mousse was to me was the stuff that you put in your hair to help keep it up. Okay, you can now take that look of disgust off your faces, forgive me, it was the early nineties and birds nests and teased fringes were still all the rage. So were bike pants and bubble skirts, but let's leave that for another post. Fast forward ten years from then and I did eventually discover that mousse is so much more than a hair product. And it appears that the mousse that you put in your mouth far outweighs the pleasures of the mousse that you put in your hair.

So of course with my limited and somewhat awry experience with mousse, I had never made it nor had any inkling as to how it was actually made. I had eaten mousse at several restaurants before, although I never got the inclination to make them for myself, until now that is. I imagined that it was very involved, with lots of of beating and whisking; I was wrong about the whisking and beating part, although I did find out with this recipe that it can get quite involved, try a few hours involved.

Chocolate-Mousse

After getting Matt Moran's self titled cookbook last year as a present from G, I would, almost daily, open the book to page 195 and gaze covetously at the photograpgh of his signature Aria dessert, the Chocolate Delice. The dessert is basically a chocolate mousse that consists of a caramel truffle base, then a layer of chocolate pastry, then above that a layer of chocolate mousse, then a thin layer of choclate icing topped with caramelised hazelnuts and a scoop of vanilla bean ice cream. Sounds divine- absolutely! Sounds complicated- oh yeah!

Having never made mousse before, let alone, a multi-layered, multi-bowl dessert from a multi-award winning restaurant, I thought to myself, slow down! I had always been taught to aim high, to reach for the stars so to say, but this was almost equivalent to flying to the moon in a rocket ship that I didn't know how to operate. Pretty much impossible I'd say. So instead of reaching for the impossible and potentially wasting blocks and blocks of precious chocolate and eggs, I decided to make my maiden voyage into mousse-dom a slightly easier one.

Chocolate-Delight

I decided I would omit the layer of chocolate pastry from the recipe and that the chocolate icing would simply be a drizzling of chocolate ganache over the mousse. A collective sigh of relief is breathed by both me and my kitchen. Even though I was leaving out the layer of chocolate pastry, the recipe still puts quite a demand on your kitchen and its utensils. By the time it came to caramelise the hazelnuts, the kitchen was a mess. Whisks, spoons, bowls were haphazardly strewn across the kitchen bench, sink piled high with saucepans and and measuring cups. It was a sight to behold, the kitchen was in full use, and all for this mousse.

Matt does warn the would-be-mousse-maker that the recipe is not for the faint-hearted. And I admit, I almost wanted to give up a few times during the process. Not that the steps are particulary difficult but simply because there are so many steps to go through, it's easy to lose heart. And the mess piling up in the sink is another deterrant to making this dessert. The stakes are high and so is the washing up afterwards.

Chocolate Mousse

But once you have completed the whole process, the end result is worth all the self-doubt and trepidation. The moment you taste the velvety soft mousse that simply melts in your mouth, you can forget all about the dishes stacked up in the sink. The caramelised hazlenuts also provide a great contrast to the silkiness of the chocolate mousse. And the truffle adds that little bit of sweetness that just completes this beautiful dish.

It's one of the best desserts I have ever tasted and it feels all the more rewarding that it was I that slaved about in the kitchen to make it happen. Now if only I could feel the same way about those dishes.

Chocolate Mousse with Caramel Truffle

If you want to see other mousses in action, then head over to the lovely Helene's blog Tartelette to check out the round up for Hay Hay its Donna Day, coming soon. For now here is the recipe for what I have called Chocolate Delights.

Chocolate Delights
adapted from
Matt Moran’s cookbook
makes 4

Chocolate Mousse with Caramel Truffle

FOR THE CARAMEL TRUFFLE
20g caster sugar
10ml water
80ml cream
125g coverture milk chocolate

FOR THE CHOCOLATE MOUSSE
70g dark chocolate, 70% cacao
1 tsp granulated gelatine
2 tbsp hot water
1 egg, at room temperature
1 egg yolk, at room temperature
150ml cream

FOR THE HAZELNUTS
¼ cup caster sugar
2 tbsp water
24 hazelnuts, roasted and skinned

FOR THE CHOCOLATE GANACHE
50ml cream
30g dark chocolate

THE CARAMEL TRUFFLE
Place four metal rings (about 7.5cm in diameter x 2cm high) on a baking tray lined with parchment paper.
Place chocolate in a small dry bowl and set aside.
In a small saucepan over low heat, combine caster sugar and water. Use a wet pastry brush to wash any sugar caught on the sides of the saucepan.
Once the sugar has completely dissolved, increase the heat to high and cook until the sugar has achieved a light golden colour.
Take the saucepan away from the heat and slowly pour in the cream. Stir until all the caramel has dissolved.
Pour caramel mixture to the chocolate and mix until the chocolate is incorporated throughout.
Pour the caramel truffle into the metal rings and set aside in refrigerator to set.

THE CHOCOLATE MOUSSE
Melt chocolate in a bowl set over a saucepan of simmering water, then set aside to cool slightly.
Place gelatine in a small bowl and dissolved with hot water, stirring continuously with a fork so as lumps do not form. If lumps do form, strain the gelatine into another bowl.
In a bowl, beat the egg and egg yolk together until light and airy, stir in the melted chocolate and then quickly mix in the gelatine.
In another bowl, whip the cream until just thickened and then fold into the chocolate mixture.
Take the rings from the fridge and fill the moulds right to the top of the rings then return to the refrigerator for another hour to set.

THE HAZELNUTS
While the mousse is setting caramelise the hazelnuts.
Preheat oven 160°C.
Spread hazelnuts on a baking tray and roast for 5 minutes.
Place roasted hazelnuts onto a dry tea towel and fold into a pouch. Vigorously rub the hazelnuts together in the tea towel for about 3 seconds to remove the skins.
Clean off hazelnuts and set aside.
Then, dissolve the sugar and water in a saucepan, over low heat.
Cook the syrup until it becomes golden in colour; be careful not to burn the sugar at this point.
Add the skinned hazelnuts to the caramel and mix them to coat.
Then immediately spoon the hazelnuts onto some greaseproof paper and set aside to cool.

FOR THE CHOCOLATE GANACHE
Bring the cream to a simmer in a small saucepan over medium heat.
Pour the cream over the chocolate in a bowl and stir until the chocolate is melted and the mixture is glossy.

ASSEMBLY
Unmould the delights by gently warming the outside of each ring with a tea towel rinsed in hot water and wrung out.
Place them onto the centre of each plate and top with 6 caramelised hazelnuts each.
Then drizzle over with the chocolate ganache.

Thursday, April 19, 2007

What me...?

Coffee and Marsala Souffle


The announcement was made quite some time ago, but I just found out today that I got an honourable mention in last month's Does My Blog Look Good In This. It was for this photo, in the Originality category! Wow, I'm blushing already, this is a great start to my day.

Coming up on Milk and Cookies: Penguins for breakfast...?

Tuesday, April 17, 2007

The Sweetest Name: Ciambelle Alla Nutella

Nutella-Donut

Its name in Italian sounds so wistful, so refined- Ciambelle Alla Nutella; although when it is translated in English, loses all its tender and romantic sensibilities and becomes merely the Nutella Donut. So perhaps I shall continue to refer to it as “the ciambelle” to maintain its dignity as one of the sweetest of sweet offerings at Balmain café scene staple Bertoni Casalinga.

Bertoni received the honourable mention of being the editor’s pick for best café in Sydney by the SMH Good Food Guide in 2006, and I wouldn’t be surprised if these sugary treats had anything to do with such a tribute. I have yet to see these particular ciambelles on offer at any other Sydney café, and if they can be obtained elsewhere, I would love to know, as I would like to embark on an in-depth comparison study. Of course this would all be in the name of research and edible blogging for the purpose of benefiting other would-be donut tasters. If there are other ciambelles out there, I would like to make it my personal mission to find out for the people of Sydney, which one is the best, being the people’s blogger, I am more than willing to undertake this task, no matter how many sugar-coated, nutella-filled donuts it will take.

When I mentioned the ciambelle alla nutella in one of my
posts earlier this year, I did not expect such a response in regards to this donut. The post wasn’t even about the donut; I had just mentioned that I had been gorging on considerable amounts of it with a friend. But I could see through people’s comments and emails, that the ciambelle alla nutella had made its impression in both people’s imaginations and palates.

Ciambelle alla Nutella
Fluffy, filled and fresh; an un-toasted Ciambelle Alla Nutella

I guess the combination of two such salivatory, drool-inducing nouns in the foodie lexicon is enough to pique many people’s interests and appetite. Who has yet been able to resist the lure of the donut, let alone one dusted with sugar and filled with Nutella. Who knew that fried dough could have such an effect?

Well let me endeavour to describe to you what the ciambelle alla nutella is like. Just imagine a soft, airy donut, moist and covered in a coating of sugar granules, cut in half then spread with an ample lathering of Nutella spread. But wait, this is only one half of its pleasure.

Bertoni gives you the option of having the ciambelles fresh, un-toasted, or you can have them toasted, as they would recommend. Toasting brings about the other half of the pleasure of the nutella donut. Upon toasting, the heat caramelises the sugar coating rendering the outside crisp and crunchy, while causing the inside of the donut steam and soften, and the nutella melting.

Words are not enough to describe how good this combination of crunch and melt go so well together. And I guess you can discover its pleasures for yourself by going to Bertoni in the flesh, or perhaps if the round trip to Sydney is a little too pricey for your liking, then make one at home. All you need are some donuts, homemade or bought, a tub of Nutella spread and a sandwhich press and the same pleasures will be yours.

Ciambelle alla Nutella

Bertoni Casalinga
281 Darling St, Balmain 2041
Phone: (02) 9818 5845

Open 7 days

Monday, April 09, 2007

Good Living Pyrmont Grower's Market, April

Seagull

This is the first time all year that I have been able to make the Good Living Pyrmont Grower's Market and of course it had to rain. The above picture pretty much describes the sad state of affairs at the markets; wet, grey and dreary. The seagull intently surveys the early morning market crowd, and really there was not much to it. There were the same stalls that are normally there and not many new ones. I think the weather just put a dampener on me, as I'm pretty enthused about going to the markets no matter how early, last Saturday I was just a big old grump.

The crowds understandably were a lot smaller, which for me a was quite advantageous, although the cold, wet weather made me keep asking myselfy why I got up so early when I could have still been in bed. Nonetheless, these hydrangeas provided the splash of colour that was very much needed to lift everyone's spirits.

Hydrangreas at the Markets
Pretty in pink and purple

Cheese at Formagi Ocello
One of my many token cheese shots from Formagi Ocello

A basket of apples
Roche Bros. pink lady apples

Pumpkin Loaves at La Tartine
Another token bread shot from La Tartine, I just love their pumpkin loaves.

Ladysmith Lamb Sign
This Ladysmith Lamb was obviously happy to be at the markets.

Free meat at Ladysmith Lamb
And when they are giving away free lamb, I would be smiling too.

Beatrice the Jack Russell
The markets aren't just a meeting place for people, it looks like this pooch has spotted someone she knows.

Hello there!
and the socialising begins...

Sunshine hits the markets
The sun did manage to come out briefly while I was watching this man cooking up breakfast.

Wet wet wet
although, the sunshine was shortlived and it was back to grey all round.

Dutch Carrots
Perfect bunches of baby carrots brighten up the morning.

Daffodil
and so does this sunny yellow daffodil.

Barrington Beef
Barrington Beef's finest offerings sell quickly.

Edmundi Smokehouse Griller
Working the grill at the Edmundi Smokehouse breakfast stall.

Cheese
more cheese

The Crowd
This pretty much summed up the markets, wet, wet, wet.

And that's another month of the Grower's Market, hopefully next month, the weather and myself won't be quite as drab.

Monday, April 02, 2007

When It's Cold Outside

Beef and Ricotta Pie

I am not one for cold weather. It just doesn’t agree with me. I know Australian winters are hardly anything to talk about, and if anyone from Siberia is reading this post, I can see you already shaking your head, appalled. I’m sure our winters here would equate more to a Siberian summer than anything else, and you probably have no sympathy for this poor little Aussie suffering through her genial winter. But I have to say, as placid as our winters can be, I just cannot abide by the cold weather.

Freezing winds, chapped lips, numb fingers and frizzy hair, the penalty of winter. My only solace in these long months of frosty torment comes in the form of food and fashion. I love winter clothing, thick woolen scarves, boots, beanies, double breasted coats; layer upon layer of clothing concealing the fact that I just ate three croissants from
Victoire, oh how I love it. Winter clothes are much more forgiving, there’s no hiding the fact that you had one too many slices of lemon meringue pie when you’re in a bikini.

Beef and Ricotta Pie

And as for food, yes, ice cream and gelato are wonderful and berries in the summertime are pure bliss but when it comes to comfort, winter food has got it down pat. Nothing spells comfort more than escaping the chill and having the pleasure of filling your belly with something warm. Be it soup, a casserole, or a hearty pie, winter food is sheer indulgence. Don’t you just love the feeling warm soup snaking its way down your throat, or cutting into a warm pie and watching the steam escape? It’s those slight nuances of winter that I love most.

So what happens when the winter chill begins to descend upon you? Well, you leave work early to make yourself a pie. Well that’s what I did anyway, and the good news is, so can you- if you are in the southern half of the globe that is. You can escape the imminent icy reception with this beautiful Donna Hay- Mince Meat and Ricotta Pie. The filling is quite hearty but it’s the topping that I adore the most- a fluffy soft covering of ricotta, eggs and cheese.

Inside a Beef and Ricotta Pie

This pie is a great option if you don’t have time for rolling out pastry. The topping can be made in a jiff and only needs to be baked for 15-20 minutes. And when the pies come out of the oven, their sides stained with its juicy overflow and the smell of baked ricotta hanging in the air, you won’t be able to resist. Just becareful not to overbake, as the ricotta can become rubbery, so you want to keep it moist and fluffy.

I adapted this recipe, adjusting the filling slighty to what was available in the fridge, and you can improvise yourself too. Just chuck in whatever you feel like eating that night and bake it in the oven, it’s that easy. I guess you could say, it’s as easy as pie.

Mince and Ricotta Pie
adapted from Donna Hay Magazine (Issue 28)
serves 8

Beef and Ricotta Pie

2 tbsp olive oil
1 brown onion, chopped
1 garlic clove, crushed
1 carrot, peeled and diced
1 cup fresh broad beans
750g beef mince
1 x 400g can chopped tomatoes
2 tbsp worcestershire sauce
sea salt and cracked pepper
2 cups fresh ricotta cheese
1 egg
1 tbsp chopped oregano leaves
¼ cup grated mozzarella cheese

Preheat oven to 220˚C.
Heat a large non-stick frying pan over high heat.
Add the oil, onion and garlic and cook for 1 minute.
Add the carrot and broad beans and cook for 3-4 minutes.
Add the mince, breaking up any lumps with a wooden spoon and cook for 8-10 minutes or until the mince is browned.
Add the tomatoes, worcestershire, salt and pepper and simmer for 15 minutes, until the mixture has thickened.
Turn off heat and spoon the mixture into 8 individual ovenproof dishes.
In a bowl, combine ricotta, egg, oregano and mozzarella.
Top the pie filling with ricotta mixture and bake in the oven for 15-20 minutes.
Serve warm.